SSH (Secure Shell) has become an essential tool for managing remote servers and IoT (Internet of Things) devices securely. Whether you're a developer, hobbyist, or someone looking to streamline your workflow, learning how to use SSH for remote IoT operations on a Mac can significantly enhance your capabilities. This guide will walk you through everything you need to know to set up and use SSH for free on your Mac.
With the increasing demand for remote access to IoT devices, understanding SSH is no longer optional but necessary. In this article, we'll cover everything from the basics of SSH to advanced configurations, ensuring you're equipped with the knowledge to securely connect to your IoT devices from your Mac.
By the end of this guide, you'll be able to confidently set up and use SSH remote IoT on your Mac without any additional costs. Let's dive in!
Read also:Exploring The Multifaceted World Of Francesca Muffaletto A Beacon Of Inspiration
Table of Contents
- Introduction to SSH
- Why Use SSH for Remote IoT?
- Prerequisites for Using SSH
- Step-by-Step Guide to Set Up SSH on Mac
- Securing Your SSH Connection
- Common Issues and Troubleshooting
- Advanced SSH Configurations
- Using SSH with IoT Devices
- Best Practices for SSH
- Conclusion
Introduction to SSH
SSH, or Secure Shell, is a cryptographic network protocol designed for secure data communication, remote command execution, and file transfer. It provides a secure channel over an unsecured network by encrypting all data transfers between the client and server.
SSH remote IoT on Mac is particularly useful for managing IoT devices from a distance. This method ensures that your data remains protected while allowing you to control your devices effortlessly.
Key benefits of using SSH include:
- Encryption of all data transmitted.
- Authentication to ensure secure connections.
- Wide compatibility with various operating systems and devices.
Why Use SSH for Remote IoT?
Security
When it comes to IoT devices, security is paramount. SSH offers robust encryption and authentication mechanisms, making it one of the safest ways to manage remote devices.
Efficiency
SSH allows you to execute commands and manage files on remote devices without the need for physical access. This makes it an efficient tool for managing IoT setups.
Cost-Effective
Using SSH for remote IoT on Mac is completely free. You don't need to invest in additional software or hardware to get started, making it an attractive option for both hobbyists and professionals.
Read also:Jessica Tarliv Bikini A Deep Dive Into Fashion Trends And Personal Style
Prerequisites for Using SSH
Before you begin setting up SSH for remote IoT on your Mac, ensure you have the following:
- A Mac computer with macOS installed.
- An IoT device with SSH enabled and an active internet connection.
- The IP address of your IoT device.
- Login credentials (username and password) for the IoT device.
Having these prerequisites in place will make the setup process smoother and more efficient.
Step-by-Step Guide to Set Up SSH on Mac
Step 1: Enable SSH on Your IoT Device
Most IoT devices come with SSH disabled by default for security reasons. You'll need to enable it through the device's settings or configuration interface.
Step 2: Open Terminal on Your Mac
Terminal is a powerful tool included with macOS that allows you to interact with your computer using commands. To open Terminal, go to Applications > Utilities > Terminal.
Step 3: Connect to Your IoT Device
Once Terminal is open, type the following command:
ssh username@ip_address
Replace "username" with your IoT device's username and "ip_address" with the device's IP address. Press Enter to initiate the connection.
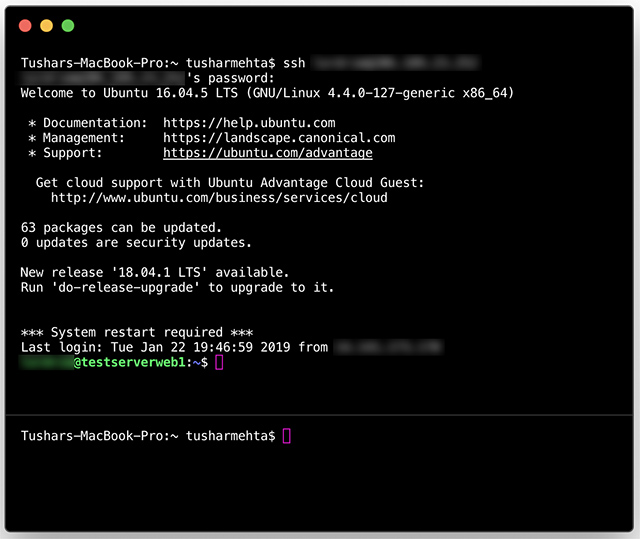
Step 4: Authenticate the Connection
When prompted, enter your password to authenticate the connection. If this is your first time connecting, you may see a warning about an unknown host. Type "yes" to proceed.
Step 5: Verify the Connection
Once authenticated, you should see a command prompt indicating that you're now connected to your IoT device. You can start executing commands or managing files as needed.
Securing Your SSH Connection
While SSH is inherently secure, there are additional steps you can take to enhance the security of your connection:
- Use Strong Passwords: Ensure that your login credentials are strong and unique.
- Enable Key-Based Authentication: This method eliminates the need for passwords and provides an extra layer of security.
- Disable Root Login: Restricting root access prevents unauthorized users from gaining full control of your device.
- Change the Default Port: Switching from the default port (22) to a custom port can deter automated attacks.
Implementing these measures will significantly improve the security of your SSH remote IoT setup.
Common Issues and Troubleshooting
Issue 1: Connection Refused
If you receive a "Connection refused" error, ensure that SSH is enabled on your IoT device and that the IP address is correct. Also, check that the device's firewall allows incoming SSH connections.
Issue 2: Authentication Failed
Double-check your username and password to ensure they're entered correctly. If you're using key-based authentication, verify that the keys are properly configured.
Issue 3: Slow Connection
Network congestion or a weak internet connection can cause slow SSH performance. Try optimizing your network settings or connecting via Ethernet instead of Wi-Fi.
Advanced SSH Configurations
Configuring SSH Tunneling
SSH tunneling allows you to securely forward network traffic between your Mac and IoT device. This can be particularly useful for accessing services that are not publicly accessible.
Automating SSH Connections
Using tools like SSH keys and configuration files, you can automate the process of connecting to your IoT devices. This saves time and reduces the risk of human error.
Managing Multiple Devices
If you manage multiple IoT devices, consider using an SSH client like iTerm2 or MobaXterm, which offer advanced features for handling multiple connections simultaneously.
Using SSH with IoT Devices
Managing Files
With SSH, you can easily transfer files between your Mac and IoT devices using commands like SCP (Secure Copy Protocol) or SFTP (SSH File Transfer Protocol).
Executing Commands
SSH allows you to execute commands directly on your IoT device from your Mac. This is useful for monitoring system performance, updating software, or troubleshooting issues.
Monitoring and Logging
SSH can be used to monitor logs and system metrics in real-time, providing valuable insights into the health and performance of your IoT devices.
Best Practices for SSH
To make the most of SSH for remote IoT on Mac, follow these best practices:
- Regularly update your SSH client and server software to ensure you have the latest security patches.
- Document your configurations and credentials in a secure location for easy reference.
- Limit access to trusted users and devices to minimize the risk of unauthorized access.
- Monitor your SSH connections regularly for suspicious activity.
Adhering to these practices will help you maintain a secure and efficient SSH setup.
Conclusion
Using SSH for remote IoT on Mac is a powerful and cost-effective way to manage your IoT devices securely. By following the steps outlined in this guide, you can set up and configure SSH with ease, ensuring that your devices remain protected while allowing you to control them from anywhere.
We encourage you to share your experiences and ask questions in the comments section below. Additionally, feel free to explore other articles on our site for more tips and tricks on managing IoT devices and optimizing your workflow.
Data sources: